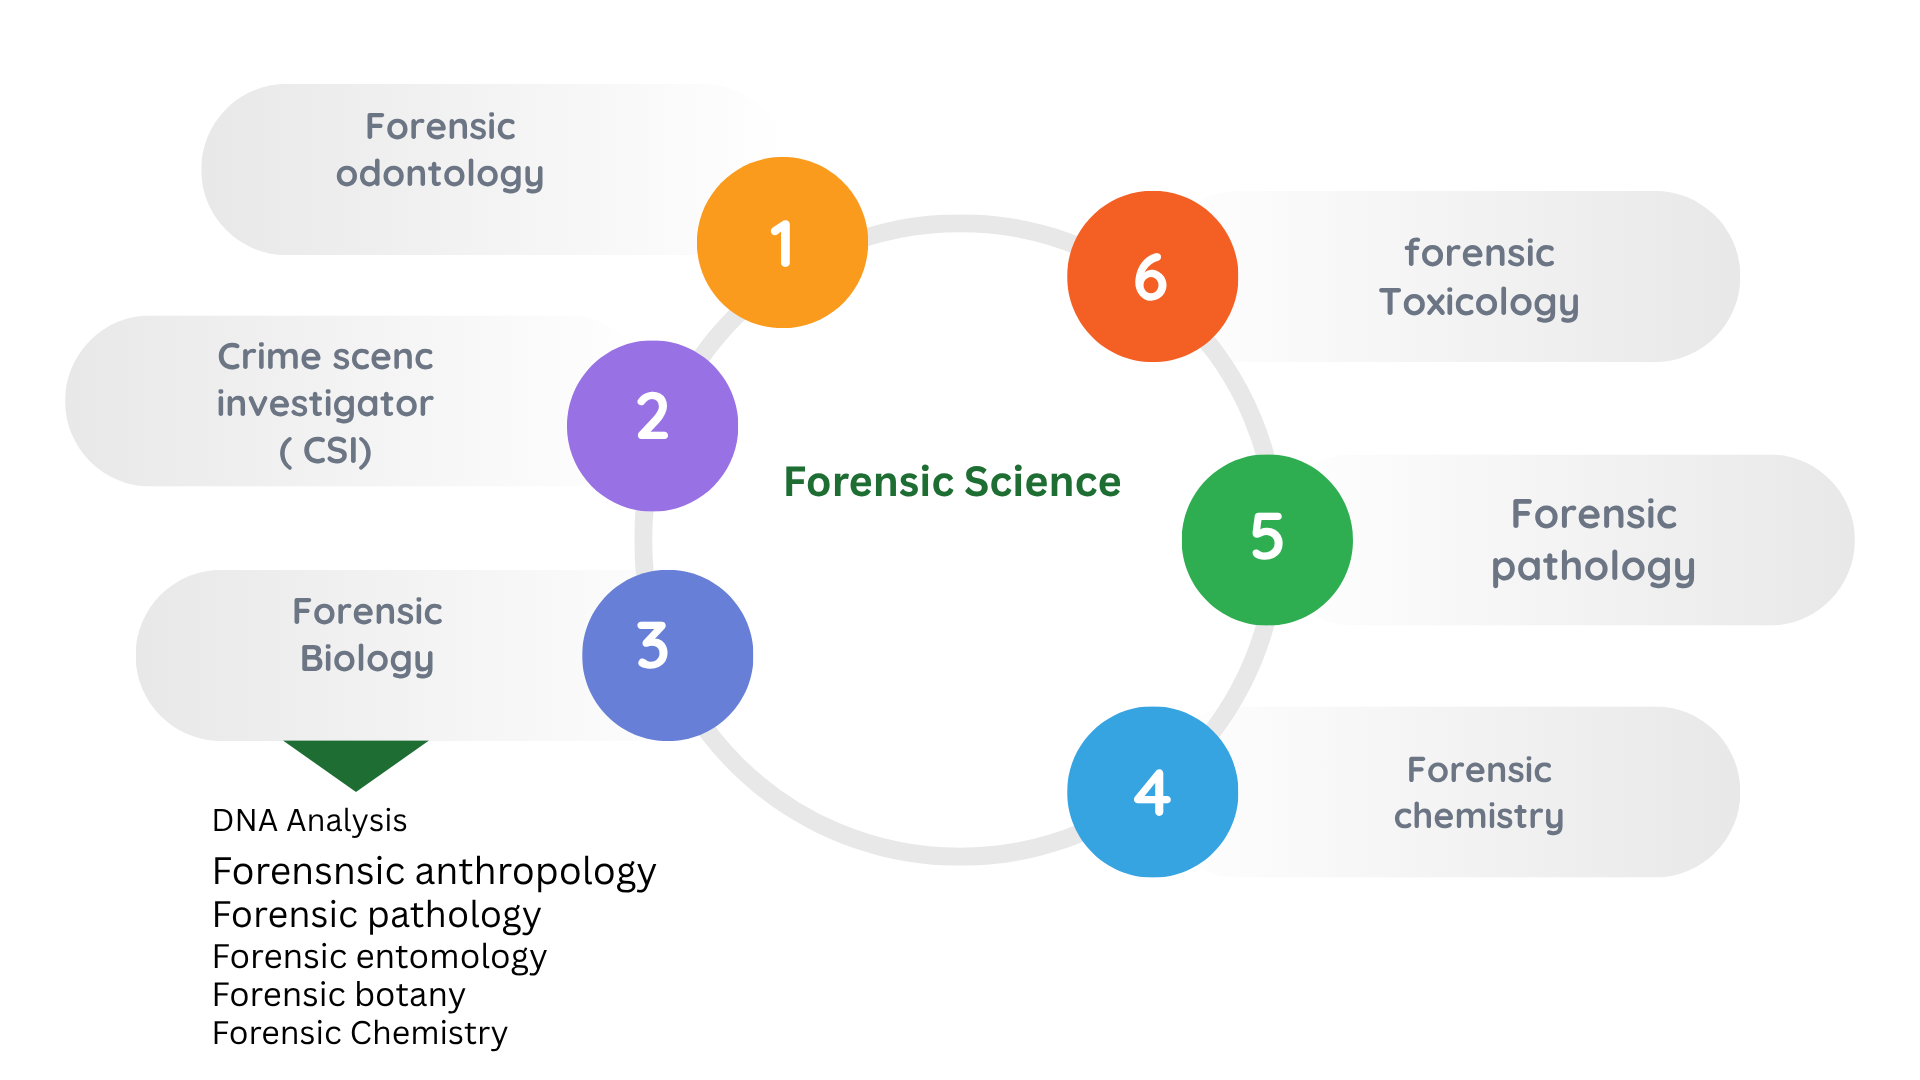
Securing the Crime Scene
Maintaining the integrity of a crime scene is critical for preserving evidence. The first responding officer must ensure the scene remains undisturbed and legally admissible.
Key Duties of the First Responder:
Ensure Safety and Provide Aid:
Assess the scene for injuries. Provide first aid if trained or call emergency services. Detain suspects without disturbing evidence.
Set a Perimeter:
Use tape, cones, or ropes to block access. Extend the boundary beyond visible evidence to protect potential trace materials.
Protect the Scene:
Prohibit use of restrooms, sinks, phones, and light switches, as they may hold forensic value.
Limit Access:
Allow only authorized personnel. Keep a log of all entries and exits with names, times, and reasons.
Prevent Contamination:
Use gloves, shoe covers, and avoid unnecessary movement within the scene.
Document Observations and Ask Key Questions:
use 5W and 1H
What,
where,
when,
why,
who,
how.
Scanning the Scene
A careful walkthrough by investigators helps form an initial theory of the crime. Key tasks include:
- Identify fragile evidence that may degrade over time.
- Document environmental factors like weather and lighting.
- Trace entry, exit, and movement paths within the scene.
- Record basic details: who, what, when, where, and how.
- Report any special needs for personnel, equipment, or safety measures.
Sketching the Scene
Creating a sketch is the final stage of crime scene documentation before collecting physical evidence. Unlike photographs, which can visually compress or distort distances, a sketch provides a scaled, accurate layout of the scene and the location of key items.
Types of Sketches:
• Plan View: A top-down perspective showing the overall layout.
• Elevation View: A side-on perspective showing vertical positioning.
At the scene, investigators typically draft a rough sketch using pencil and graph paper to quickly capture measurements and object placement. Later, a finalized version can be produced using ink, drafting tools, or software. It is essential to retain the original sketch, as it may be critical for investigative or legal reference.
Searching for Evidence
A thorough, organized search is key to finding evidence while keeping it intact.
Search in Phases
• Phase 1: Visual Check
Scan with eyes and simple tools, mark items, and document before touching.
• Phase 2: Careful Inspection
Open containers, move light objects, and search hidden spots, recording all findings.
• Phase 3: Detailed Search
Conduct invasive checks like removing flooring or using chemicals only after securing visible evidence.
Identify Evidence Sources
- Focus on potential evidence from:
- The victim’s body
- The main crime scene
- Related secondary locations
- The suspect(s)
Maintain Evidence Integrity
- Protect the scene from contamination
- Keep a strict record of evidence handling
- Use teams to verify thoroughness
- Have a coordinator manage the process and documentation
Types of Evidence Search Methods
- Grid Search
- Line (Strip) Search
- Zone (Quadrant) Search
- Spiral Search
- Wheel (Ray) Search
- Link Search
Grid Search
- Overview: Combines two sets of perpendicular searches, forming a grid to ensure no area is missed.
- Ideal for: Expansive, open environments where evidence may be widely dispersed.
- Typical Locations: Agricultural fields, large parking areas, stadium grounds, airport tarmacs.
- Benefit: Offers double coverage, minimizing the risk of overlooked evidence.
Line (Strip) Search
- Overview: Searchers align side-by-side and move forward in parallel lines, covering the scene systematically.
- Ideal for: Vast, flat terrains where coordinated group searching is feasible.
- Typical Locations: Highways, beaches, open grasslands, desert areas.
- Benefit: Easy to organize large teams and provides thorough linear coverage.
Zone (Quadrant) Search
- Overview: The scene is segmented into manageable sections, with teams assigned to thoroughly examine each area.
- Ideal for: Complex or cluttered environments requiring focused attention on distinct zones.
- Typical Locations: Residential homes, commercial buildings, warehouses, multi-room interiors.
- Benefit: Efficient for intricate settings, ensuring detailed inspection without overlap.
Spiral Search
- Overview: A single searcher starts at a point and moves in an expanding or contracting spiral pattern.
- Ideal for: Confined spaces or when evidence is concentrated near a specific spot.
- Typical Locations: Crime scenes inside vehicles, small rooms, around a victim’s body, near a weapon or object of interest.
- Benefit: Requires minimal personnel; ideal for initial or small-scale searches.
Wheel (Ray) Search
- Overview: Searchers fan out from a central point in straight lines radiating outward, resembling spokes on a wheel.
- Ideal for: Compact scenes with a clear center of activity.
- Typical Locations: Small wooded patches, backyards, parking garages, small event venues.
- Benefit: Quickly covers all directions from a focal point.
Link Search
- Overview: Investigators connect pieces of evidence and follow logical trails to uncover additional clues.
- Ideal for: Scenes with scattered or connected evidence across multiple locations.
- Typical Locations: Tracking footprints or blood trails through urban areas, following discarded items along a route, mapping movements in a crime
- Benefit: Adaptable and focused, allowing investigators to follow leads organically.
Crime Scene Documentation
Thorough and timely recording of a crime scene is essential to preserve its condition for investigations and court processes, as the environment can change rapidly.
Main Documentation Techniques:
Photography & Video
- Photograph the scene in its original state, noting any alterations or movements of objects.
- Capture both broad views and detailed close-ups of evidence, victims, injuries, and weapons.
- Use reference markers to show the size of items.
- Employ digital tools for enhanced, high-resolution images, including panoramic shots.
- Video documentation with real-time commentary offers a continuous, clear depiction of the scene.
Sketching
- Draft preliminary sketches at the site, which are later refined into accurate, scaled diagrams.
- Include critical details like date, time, scale, compass points, measurements, and labels.
- Clearly identify evidence spots and key individuals involved, accompanied by a legend.
Notes - Maintain comprehensive notes describing the scene, environmental factors, evidence placement, and personnel present.
- Log times and details regarding the discovery, collection, and handling of all evidence.
- Ensure notes are detailed enough to serve as a reliable reference long after the investigation.
Notes
- Maintain comprehensive notes describing the scene, environmental factors, evidence placement, and personnel present.
- Log times and details regarding the discovery, collection, and handling of all evidence.
- Ensure notes are detailed enough to serve as a reliable reference long after the investigation.
Securing, Collecting & Packaging of Evidence
The integrity of physical evidence relies on how well it is secured, collected, and packaged. Proper handling not only preserves the forensic value of evidence but also ensures it remains legally admissible in court. A well-documented chain of custody must be maintained throughout.
Securing the Scene and Evidence
- Only trained and authorized individuals should be involved in collecting evidence. One designated team member typically oversees this process.
- The crime scene must be cordoned off to prevent disturbance or contamination.
- Before collecting any item, it should be thoroughly documented in its original position using written notes, photographs, and diagrams.
Evidence Collection Procedures
- Prioritize Fragile Items: Time-sensitive or easily degraded evidence (such as blood traces, hair, or fibers) should be collected first to prevent loss.
- Use Specialized Tools: Tweezers, gloves, swabs, forceps, and evidence vacuums are employed based on the evidence type.
- Isolate Each Sample: Every item must be collected and stored separately to avoid contamination between items.
- Trace Materials: Microscopic or small items such as soil particles, fibers, or hairs are often collected using tape lifts or filtered vacuuming.
- Clothing as Evidence: Victim or suspect garments may contain key biological or trace evidence and should be collected in full if necessary.
- Body-Related Evidence: Items like fingernail scrapings or biological material from a body must be collected by medical or forensic professionals.
- Fingernail Scrapings: These are particularly important for identifying potential struggle or contact-related evidence.
Proper Packaging Techniques
Double Containment: Evidence is first placed in a suitable primary container (such as a paper bindle or vial), and then inside a secure secondary container (like an envelope or evidence bag).
- Clear Identification: Each package must be labeled with:
Case ID number
Evidence item number
Detailed description
Victim or suspect’s name (if applicable)
Date and time of collection
Exact location of recovery
Name and signature of the person collecting the item
- Avoid Contamination: Store each item in its own package to prevent any cross-contact.
- The druggist’s fold is a specific folding method used for securing fine trace evidence in paper—ensuring it doesn’t spill or become lost during transit.
Chain of Custody
The chain of custody refers to the documented process that tracks the collection, handling, transfer, and storage of evidence from the moment it is recovered at the crime scene until it is presented in court. This process ensures that the evidence remains intact, untampered, and legally admissible.
Purpose of Chain of Custody
- Preserve Integrity: Ensures evidence is not altered, replaced, or contaminated at any stage.
- Maintain Accountability: Identifies every individual who handled the evidence.
- Establish Authenticity: Confirms that the evidence presented in court is the same as what was originally collected.
- Support Legal Proceedings: A clear, unbroken chain is essential for the evidence to be accepted by the court.
Key Elements in a Chain of Custody Record
Each time evidence changes hands, the following must be documented:
- Case Number
- Description of the Evidence
- Unique Evidence Item Number
- Date and Time of Collection or Transfer
- Location of Collection or Transfer
- Name and Signature of Person Receiving or Releasing the Evidence
- Purpose of Transfer (e.g., lab analysis, storage, courtroom presentation)
Chain of Custody Process
Collection at the Scene
- Evidence is collected, documented (photos, sketches, notes), labeled, and sealed in appropriate containers.
- Initial entry is made into the evidence log.
Evidence Submission
- The collected item is handed over to a designated evidence technician or submitted to the forensic lab.
- A record is created or updated each time it moves or is accessed.
Laboratory Analysis
- Forensic specialists examine the evidence. All tests, handling procedures, and personnel involved are recorded.
Storage and Security
- When not in use, evidence is stored in secured facilities with restricted access.
- Any access must be logged.
Court Presentation
- The final stage may involve presenting the evidence in court, where the full chain must be shown as uninterrupted.
- Any breaks or errors can cause the evidence to be ruled inadmissible.
Best Practices for Maintaining Chain of Custody
- Use tamper-evident packaging for all evidence.
- Label each item clearly with case and item numbers.
- Ensure entries are made immediately during each transfer.
- Restrict access to authorized personnel only.
- Conduct regular audits to verify accuracy of the logs and records.
Consequences of a Broken Chain
A broken or undocumented chain of custody can:
- Lead to evidence being excluded in court
- Cause case dismissal or wrongful acquittals
- Undermine the credibility of the investigation
Crime Scene Reconstruction
Crime scene reconstruction is a forensic method used to piece together the events of a crime using physical evidence, scientific principles, and investigative findings. The aim is to build a logical narrative of what occurred free of bias and grounded in fact.
Objectives of Reconstruction
- Sequence Determination: Identify the order in which actions took place before, during, and after the crime.
- Behavioral Insight: Understand the roles and movements of victims, suspects, and others involved.
- Evidence Verification: Compare physical findings with witness or suspect accounts to confirm or challenge their validity.
- Gap Identification: Expose areas where evidence is missing or inconsistent.
- Case Development: Help form a reliable theory for investigators and assist in courtroom presentation.
Categories of Reconstruction
- Event-Based Reconstruction
Reconstructs the full sequence of events in a case, from the initial contact to the resolution.
Example: Tracking a burglary from entry to escape. - Incident-Specific Reconstruction
Focuses on a single occurrence within a larger event.
Example: Reconstructing a firearm discharge to determine shooter positioning. - Physical Pattern Reconstruction
Analyzes the patterns formed by physical evidence such as blood, glass fractures, or drag marks.
Example: Examining blood droplets to identify direction and impact force.
Phases of Reconstruction
- Preservation & Initial Survey
The scene is secured to prevent contamination. Visual assessments, photographs, and sketches are completed. - Evidence Collection & Examination
Physical items like DNA, weapons, or fibers are gathered methodically and analyzed for relevance. - Pattern Interpretation
Forensic experts study elements such as trajectories, stains, or impressions to infer actions. - Action Reconstruction
Investigators outline individual movements and interactions using spatial and physical clues. - Hypothesis Generation
A plausible narrative is constructed based on all analyzed evidence. - Verification & Refinement
The working theory is tested for consistency, with adjustments made as new findings emerge. - Reporting Findings
A structured, factual report is compiled to summarize the reconstruction for legal and investigative use.
Tools & Techniques Commonly Employed
Blood pattern interpretation tools
Ballistics and trajectory simulators
Forensic 3D modeling software
Digital reconstruction systems
DNA profiling equipment
Fingerprint comparison systems
Pathology and autopsy reports
Geographic or timeline mapping
Significance in Investigation
- Helps clarify ambiguous or conflicting evidence
- Supports courtroom testimony with scientific backing
- Offers an unbiased view of what likely occurred
- Strengthens the credibility of forensic findings
- Provides a visual or narrative bridge between evidence and interpretation